Beef Brisket Recipe
 Here a step by step recipe for my brisket. I usually start off the night before with vegetable broth injections and rub application, then proceed the day after by starting the fire at 6am. Brisket will be then ready around 4pm. This allows me to serve dinner (including 2 hours rest in an isobox).
- Prepare 400ml of a savoury vegetable and/or beef broth, using a syringe, inject your brisket with 200ml of it. Save the remaining 200ml, you will need it the next day.
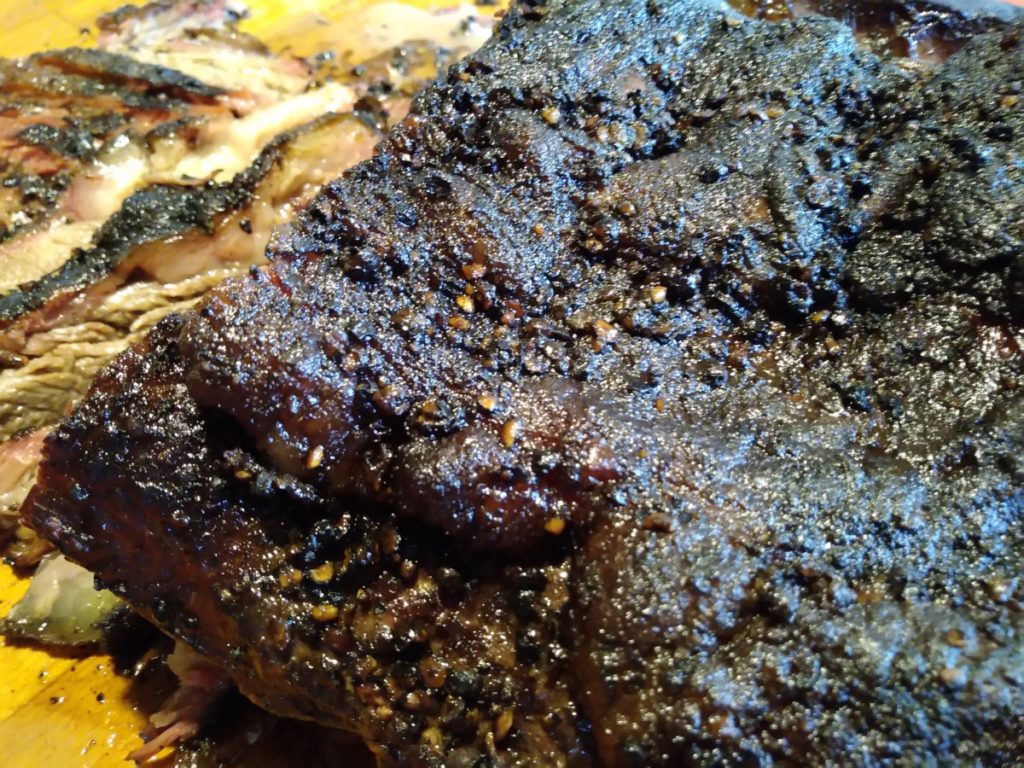
- Lightly brush surface with extra virgin olive oil, and then evenly apply a rub prepared with 60% salt, and 40% coarse grind black pepper.
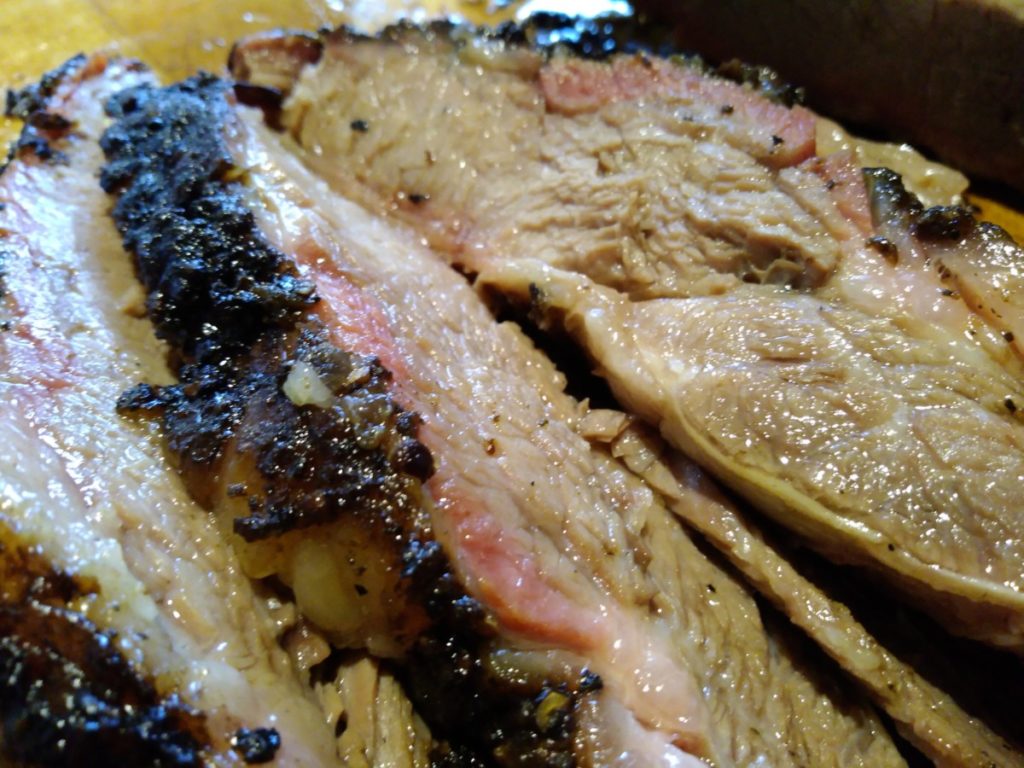
- Now is the time to cut a deep scar on one corner of your briske, in order to make it stand out where the grain runs. Since we are going to develop a thick an consistent bark, the meat grain will not be visible after the cooking is done, and we will need to cut against it.
- Rest overnight in the fridge.
- Start a chimney with 20 weber briquettes. Wait 25-30 minutes for the briquettes to be completely on fire. Please take weather in consideration and increase by up to 4 briquettes if weather is extremely cold and/or wet, decrease by up to 4 briquettes if weather is extremely hot.
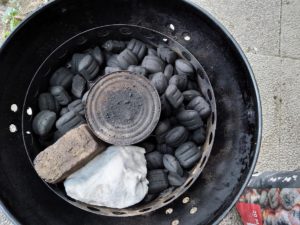 Setup a snake minion using a large tomato can at the very center of the base grill, then distribute a layer of about 2 briquettes all around the remaining ring. Use a clay brick cut in half to separate the lit briquettes from the unlit ones. This way the lit briquettes will burn counterclockwise.
NOTE: The cloth you see on the very bottom of my Weber Smokey Mountain 57cm is a placeholder for where you should place the lit briquettes.- Put some nice chunks of hickory, cherry, apple or oak wood (or a blend thereof) on top of the first third of the ring (you will need wood smoking up to the first 3 hours – meat will not receive any extra smoke after the temperature rises above 65°C).
- Add 4 liters of hot water to the water pan.
- Place your brisket fat cap side up.
- Add your thermometer probes and stabilize the Weber temperature at around 110°C. I normally have my damper valves set to 1/3 (both the 3 at the bottom and the one at the top).
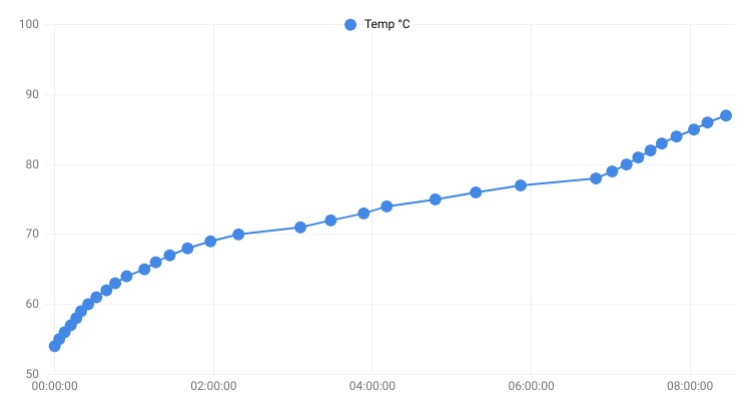
- Internal beef temperature will slowly rise until it reaches about 70°C, then the speed at which it increases will almost stop for about 4 hours until it reaches 78°C. This is called “stall” and is perfectly normal as the collagen transitions from one coherent state to a less stable one. Do not worry, there is nothing wrong, you just need to wait. (see table and temperature graph)
- Checkin every 30 minutes to spray the meat surface with the broth you set apart the day before. Pipe / pat semi-dry the excess liquid on the surface, this will allow for a better bark to form.
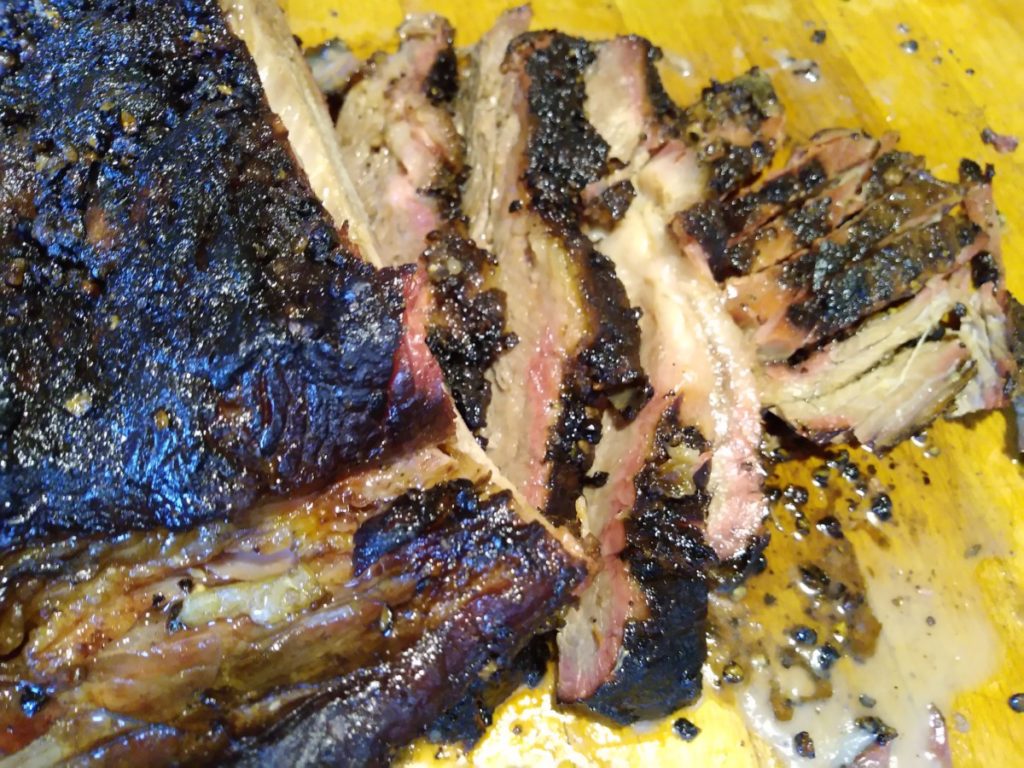
- As soon as the core beef temperature reaches 88°C remove the brisket from the Weber.
- Wrap it in 4 layers of aluminum foil and put to rest in an isobox (or camping cooler) for 2-3 hours. This will allow the collagen to regain some structure and for the liquids to re-distribute throughout the meat.
- Enjoy!
Appendix
Brisket temperature graph and table in Celsius (stall graph)
| Timestamp | Temp °C | delta-T |
| 00:00:00 | 54 | 00:03:26 |
| 00:03:26 | 55 | 00:04:07 |
| 00:07:33 | 56 | 00:04:38 |
| 00:12:11 | 57 | 00:04:08 |
| 00:16:19 | 58 | 00:03:37 |
| 00:19:57 | 59 | 00:05:23 |
| 00:25:19 | 60 | 00:06:11 |
| 00:31:30 | 61 | 00:07:36 |
| 00:39:06 | 62 | 00:06:38 |
| 00:45:44 | 63 | 00:08:36 |
| 00:54:19 | 64 | 00:13:30 |
| 01:07:49 | 65 | 00:08:33 |
| 01:16:22 | 66 | 00:10:31 |
| 01:26:54 | 67 | 00:13:32 |
| 01:40:26 | 68 | 00:17:15 |
| 01:57:41 | 69 | 00:21:11 |
| 02:18:52 | 70 | 00:46:46 |
| 03:05:38 | 71 | 00:22:56 |
| 03:28:34 | 72 | 00:24:52 |
| 03:53:26 | 73 | 00:17:25 |
| 04:10:51 | 74 | 00:36:41 |
| 04:47:32 | 75 | 00:30:36 |
| 05:18:08 | 76 | 00:33:51 |
| 05:51:59 | 77 | 00:56:53 |
| 06:48:52 | 78 | 00:12:18 |
| 07:01:10 | 79 | 00:10:51 |
| 07:12:00 | 80 | 00:08:50 |
| 07:20:50 | 81 | 00:09:16 |
| 07:30:06 | 82 | 00:08:32 |
| 07:38:38 | 83 | 00:11:05 |
| 07:49:43 | 84 | 00:13:13 |
| 08:02:56 | 85 | 00:10:14 |
| 08:13:10 | 86 | 00:14:00 |
| 08:27:11 | 87 | 00:13:56 |
| 08:41:06 | 88 |